The Stamp That Never Looks Like a Stamp: Pad Printing in Vinyl Toy Production
There is a step in vinyl toy production that most collectors never think about but would immediately notice if it disappeared. Take away injection molding and you have no torso. Take away slush casting and you have no soft vinyl shell. But take away pad printing and you have a figure with no face — just a smooth, paint-gradated blob where the eyes, logos, and text used to be. Pad printing is the detail layer, the step that turns an adequately painted body into a recognizable character. In vinyl toy production, it is also the most underestimated process on the factory floor.
What Pad Printing Actually Is
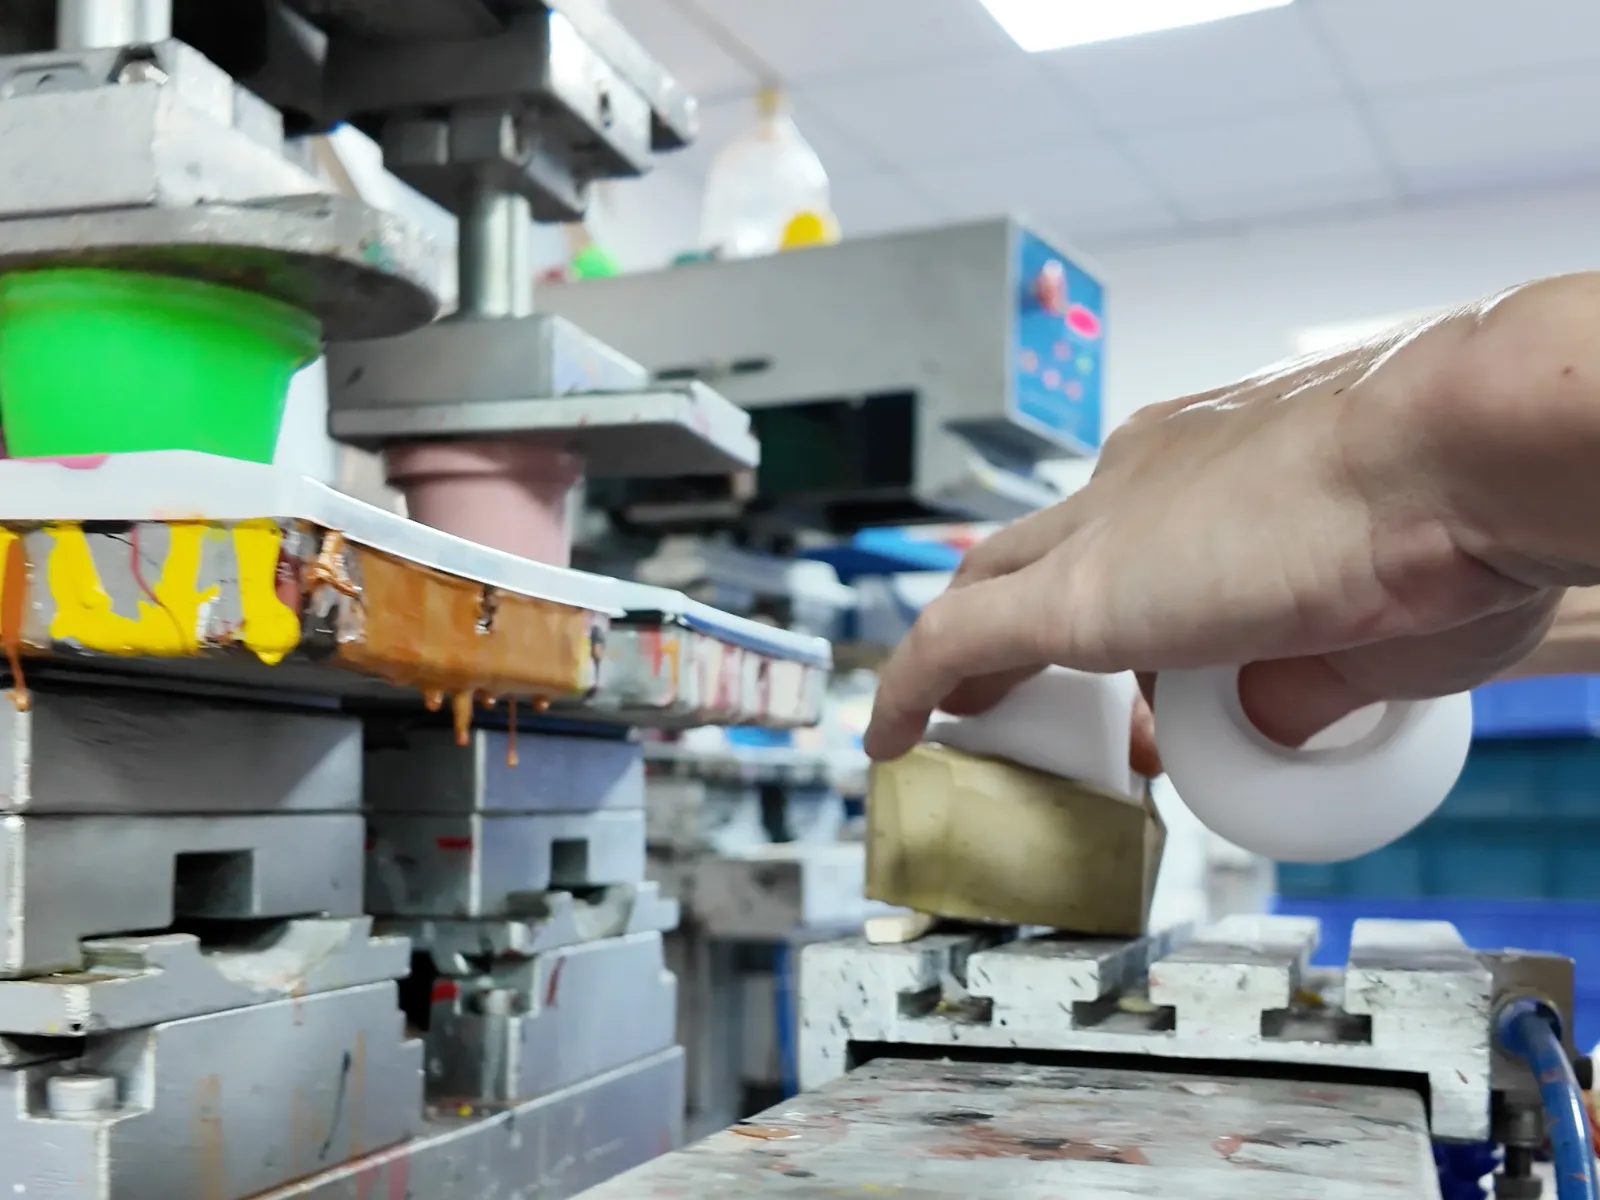
The principle is old and simple. You etch a design into a flat steel plate — the cliché. You flood the etched recesses with ink, then scrape the flat surface clean, leaving ink only in the etched channels. A silicone pad presses down onto the plate, picks up that ink, travels across to the part, and deposits the image. Lift, reset, repeat. In the context of vinyl toy production, this sequence runs thousands of times a day across dedicated pad-printing stations. What makes it valuable is not the mechanism but the geometry. Pad printing handles curved surfaces, compound curves, and irregular profiles that would destroy a screen print setup. The silicone pad deforms as it makes contact, then springs back — and in that brief elastic moment of deformation, it conforms to the contour of whatever it is pressing against, transferring a clean, precise image onto a surface that has no flat planes at all.
The process is described as indirect intaglio printing — indirect because the ink never travels directly from plate to substrate, and intaglio because the image is cut into the plate rather than raised above it. In vinyl toy production, that indirectness is the whole advantage. It is also what makes the process so sensitive to ink chemistry, because each transfer stage introduces a new surface-energy interface that the ink must navigate successfully.
The Six Steps of a Single Print Cycle
A single pad-printing cycle in vinyl toy production breaks down into six precise stages. First, ink application: an ink roller or enclosed ink cup floods the etched steel plate with a controlled layer of ink, filling every etched recess. Second, scraping: a hardened steel blade — typically 0.25 mm spring steel, ground flat and sharp — sweeps across the plate, removing surface ink while the etched channels retain theirs. A nicked or dull blade leaves residual ink on the plate surface, bleeding into the image perimeter on every subsequent print.
Third is the counterintuitive flash-off step: before the silicone pad descends, the ink in the etched channels is allowed to partially evaporate. The solvent in the top layer volatilizes, leaving a slightly tacky surface. This tackiness is precisely what allows the pad to lift the ink cleanly — if the ink is too wet, it bonds to the plate more strongly than to the silicone; if too dry, the ink breaks and leaves fragments behind. The flash-off window varies with ambient temperature and humidity, which is why air-conditioned print rooms in vinyl toy production are not a luxury.
Fourth, pad descent and pick-up: the silicone pad presses into the plate, deforming to fill the etched channels from the top. The partial curing means the pad peels the ink away cleanly and carries the complete image. Fifth, transfer: the pad moves to the substrate — typically a cast vinyl figure part — and presses down, its elasticity allowing it to conform to the surface contour. The ink, now with further solvent evaporation during pad travel, has reached a second-stage tackiness that bonds more readily to the substrate than to the silicone. Sixth, release: the pad lifts away. Ideally, 86% or more of the ink transfers to the substrate. The whole sequence depends on controlling one variable above all others: ink dry-down rate. Seasonal humidity swings — especially severe in Guangdong Province — require continuous solvent blend adjustments to keep the dry-down window stable.
The Steel Plate: Where the Image Lives
Before any ink can move in vinyl toy production, someone has to build the cliché — the etched steel plate that holds the image. The plate is the permanent tooling in the process: while pads wear out and ink is consumed, a well-maintained steel plate can serve a vinyl toy production line for years. The process starts on a computer, where artwork is separated into single-color layers and output as a film negative. The plate itself is flat tool steel in one of three formats: thick steel (roughly 10 mm, durable, for long production runs), thin steel (0.25 to 0.5 mm, pre-coated with photosensitive emulsion, more economical for medium runs), or nylon photopolymer plates (best print resolution, shortest lifespan of five to ten thousand impressions versus effectively unlimited for steel).
The photochemical process: clean the plate with xylene, apply photosensitive emulsion by centrifugal coating, bake at 150–200°C for five to ten minutes. In darkness, position the film negative against the emulsion surface and expose under UV at roughly 18 inches for one to three minutes. Develop, blow-dry, rinse clean. Then comes the etch: dilute nitric acid at 20–50°C is brushed evenly over the image area, dissolving bare steel where the emulsion was removed. Target etch depth: 15–30 microns. Done in two passes — a single pass risks going too deep and ruining the plate. That etch depth directly determines ink film thickness in the final print. Vinyl toy production specifications target a wet ink film of 4–8 microns on the substrate; the etch depth, pad hardness, and ink viscosity all interact to hit that target.
The Silicone Pad: The Bridge That Deforms on Purpose
The pad is a cast silicone dome — round, rectangular, or compound-tapered depending on substrate geometry — that does its job specifically by being imperfect. It is not rigid. It does not maintain its shape under pressure. That instability is the feature. Pad hardness in vinyl toy production is specified in Shore A: soft (30A), medium (35A), and hard (40A). Finer linework and tight registration require harder pads; heavily contoured substrates need softer pads to conform without creating air pockets or image shear. A typical vinyl figure face might use a medium-hard pad for the eye graphics and a softer pad for work that wraps around the cheek radius.
The pad is manufactured in-house at most vinyl toy production facilities. Three components — silicone rubber compound, silicone oil, and a curing accelerator — are combined and poured into an open mold, then cured for roughly 12 hours at room temperature. The silicone oil content controls hardness: more oil yields a softer pad. After about 50,000 impressions the pad surface shows wear — image edges soften, registration drifts — and replacement is standard. New pads carry a thin release agent from the mold that prevents proper ink transfer. Before use, the pad face must be wiped with a lint-free cloth dampened with ethanol or plate-cleaning solution. Skipping this step costs an entire shift's output.
Ink Selection by Substrate
Ink chemistry in vinyl toy production is not interchangeable. Getting the ink-to-substrate match wrong is one of the top causes of field returns — figures arrive at retail with pad-printed eyes that peel off after a few weeks of handling. Vinyl toy production commonly uses three ink categories. Soft-vinyl inks are formulated for plasticized PVC, the flexible shells of slush-cast figures; their resin system is compatible with PVC's plasticizer migration, which would cause ordinary inks to peel. Hard-plastic inks serve rigid ABS, PC, and hard PVC injection-molded components, with a harder binder system and higher solvent content for surface penetration. Metal inks are for zinc alloy, aluminum die-cast, or plated surfaces on premium figures, with an entirely different binder chemistry that depends on mechanical interlocking with a primer or etched metal surface.
PP and PE are notoriously ink-hostile because their non-polar molecular surface resists bonding with almost any conventional ink system. The practical solution is surface treatment — corona or flame treatment — immediately before printing, or specially formulated primer-based PP inks. Color management operates on PANTONE spot color references. Multi-tone artwork uses YMCK halftone separation; solid colors and text use the corresponding PANTONE mixed ink. A standard quality specification requires the printed color to fall within an acceptable Delta-E range from the client-approved reference swatch, with a cross-hatch adhesion test result of less than 5% ink removal.
Machine Types and Multi-Color Registration
Most vinyl toy production factories operate open-cup (ink roller) machines for standard work and sealed ink-cup machines for environmentally sensitive inks or jobs requiring solvent containment. For multi-color work, three machine types handle registration differently. Flat-shuttle machines move the substrate between color stations horizontally — registration accuracy depends on precise fixture alignment. Rotary turntable machines rotate the workpiece through sequential printing positions with faster cycle time but lower registration precision, acceptable for bold graphics. The highest-precision option is the four-color rotary head system: four pad assemblies rotate around one axis, four ink plate assemblies rotate around a second axis, and each pad services only one fixed plate. This eliminates cumulative positioning error and enables halftone multi-color registration — relevant in high-end vinyl toy production where character likenesses require precise iris detail and pupil placement.
The Troubleshooting Reality
Quality control in vinyl toy production pad printing involves recognizing roughly twelve distinct failure modes. Blurred edges — the most common defect — usually means ink viscosity is too high, the pad is pressing with insufficient force, or the substrate fixture is allowing the part to shift. A blurred-edge defect that only appears after the first hundred parts points to ink thickening over time as the open-cup ink dries down during the run: a solvent management issue, not a setup error. Pin holes — tiny voids in the ink film — indicate air entrapped between pad and plate during pickup, contamination on the pad surface, or etching defects in the plate. Recurring pin holes at the same location need a plate inspection.
Ink adhesion failure is frequently a substrate preparation issue. Slush-cast vinyl parts must have all mold release agent removed before printing — residual release agent is effectively a non-stick barrier. In vinyl toy production facilities that skip this cleaning step, adhesion failures show up three to six months after the product reaches retail. Smearing — ink spreading outside the intended image boundary — comes from ink that is too thin or from a pad that is sliding rather than pressing vertically; fixture design is therefore one of the underappreciated engineering tasks. Registration drift in multi-color runs traces either to thermal expansion of the plate or to gradual fixture wear. A registration check every 200 to 500 pieces is standard practice. Ink drying in the plate channels — the ink crusts inside the etched recesses — is a function of solvent evaporation rate and ambient humidity; the fix is either a slower solvent blend or an air-conditioned printing room.
Each failure mode has a rework path: clean the ink with thinner, allow full evaporation, reprint. A part that cannot be cleaned without damaging the paint layers beneath it — and there are often five or six spray passes beneath a pad-printed eye — goes to scrap. Minimizing the scrap rate at the pad printing station is a primary cost lever in vinyl toy production, and it starts with keeping the flash-off window, ink viscosity, and fixture alignment all within spec simultaneously.
Why Pad Printing Is Not Going Away
Screen printing is faster and lays down a heavier ink film. Laser marking is faster still and requires no consumables. Neither displaces pad printing in vinyl toy production, because neither handles three-dimensional curved surfaces with the same combination of precision, color control, and substrate flexibility. UV inkjet printing on curved surfaces has improved but still struggles with the compound curvature of a typical vinyl figure — the droplet placement accuracy that works on a mildly curved phone case breaks down on a sphere or a deeply undercut cheekbone.
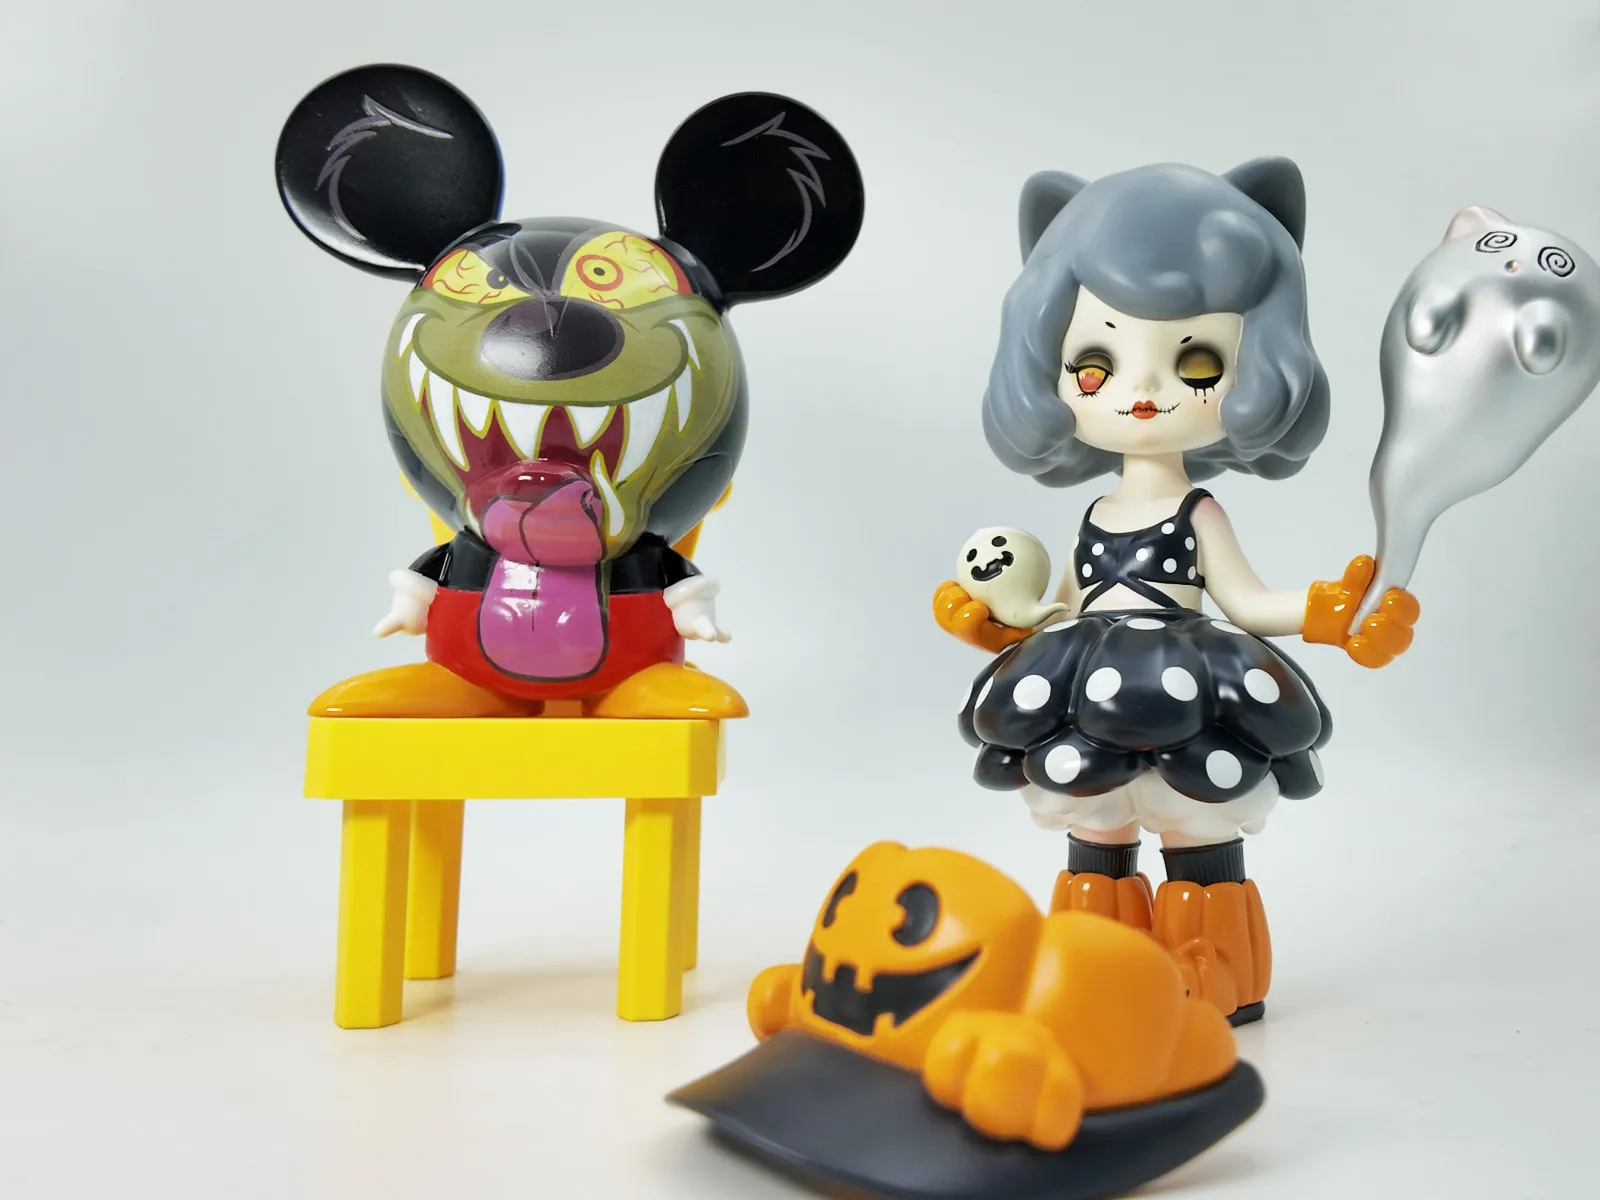
A six-centimeter vinyl figure has perhaps four to eight pad-printed features: a pair of eyes with up to three colors each, a logo on a chest plate, registration marks, and text. Every one of those features sits on a curved surface with a different radius and orientation. Running them through a pad printer, with a dedicated fixture and a matched silicone pad geometry for each feature, is still the only economical path to consistent results in volume vinyl toy production. The tooling cost for a complete pad-printing setup — plates, pads, fixtures — is modest compared to injection molds, which is why pad printing scales efficiently from small-batch limited editions to mass production runs. The process has been standard in the toy industry for over forty years. The materials have improved, the machine precision has improved, but the fundamental transfer sequence — steel plate to silicone pad to substrate — is unchanged. Until someone builds a robot that can match the deformation geometry of a silicone dome at production speed and cost, every pair of eyes on every figure will have been placed there by the same physics-based stamp-and-release trick that has defined the process since the beginning.